The Ultimate 3-Ingredient Chocolate Cherry Dump Cake Recipe
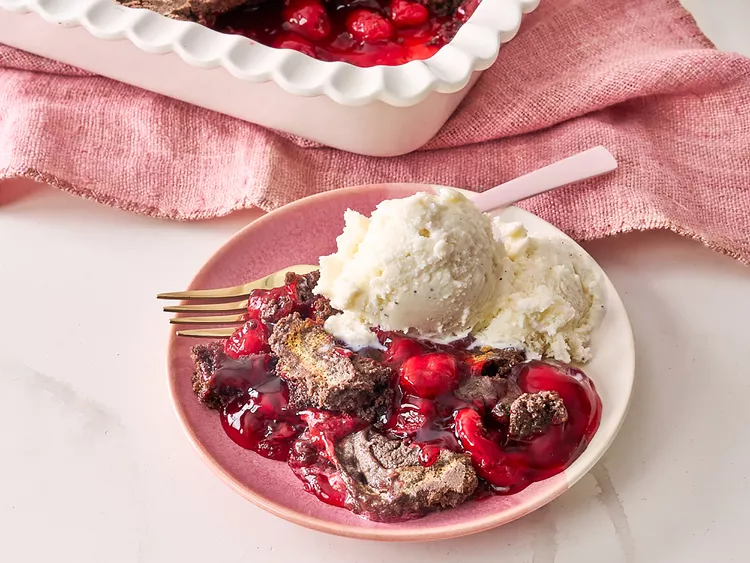
For home bakers and busy cooks seeking maximum reward for minimal effort, few desserts deliver like the classic dump cake. Stripping away the precise measurements, multiple mixing bowls, and labor-intensive cleanup of traditional baking, this 3-ingredient chocolate cherry dump cake relies on a clever culinary interaction between convenience ingredients. The result is a dessert that punches far above its weight class: a rich, fudgy, brownie-like chocolate crust sitting atop a bubbling, intensely bright cherry ribbons base.
The brilliance of this recipe lies in its utter simplicity. By understanding how moisture behaves in the oven, you can create a dessert with distinct textural contrasts—gooey and warm underneath, crisp and chewy on top—without ever picking up a whisk. Whether you are prepping for a last-minute potluck or looking for a comforting weeknight treat, this pantry-staple dessert delivers bakery-level satisfaction with under five minutes of active prep work.
The Culinary Science Behind the Dump Cake
While the method may seem casual, the physics of a dump cake are remarkably sound. Traditional cakes require rigorous emulsification to build structure. A dump cake, however, functions through a controlled steam-and-saturate process.
As the baking dish heats in the oven, the moisture from the canned cherry pie filling begins to boil. This trapped moisture rises as steam, hydrating the bottom layer of the dry chocolate cake mix from below, transforming it into a lush, pudding-like cake texture.
Simmering simultaneously from the top, the melted butter flows downward through the remaining dry cocoa powder and flour. The high fat content interacts with the sugars in the cake mix, melting them into a crinkly, glossy crust that mimics the texture of a premium Dutch-process brownie. Because the cake mix is never mechanically beaten, it avoids gluten development entirely, ensuring the final bite remains remarkably tender, soft, and melt-in-your-mouth decadent.
Ingredients and Component Breakdown
With only three elements occupying the stage, the quality and type of each ingredient directly dictate the outcome of your cake. Choosing the right components ensures the perfect balance of sweetness, acidity, and moisture.
-
2 cans (21 ounces each) Premium Cherry Pie Filling: Look for brands that list whole cherries as the primary ingredient rather than high-fructose corn syrup. A high-quality filling provides the necessary tartness to cut through the heavy chocolate.
-
1 box (15.25 ounces) Fudge or Devil’s Food Chocolate Cake Mix: Varieties labeled “fudge,” “double chocolate,” or “Devil’s Food” contain a higher cocoa-to-flour ratio, yielding a deeper color and a more intense chocolate profile.
-
3/4 cup (1.5 sticks) Unsalted Butter: Melted entirely. Unsalted butter allows the natural fruit and cocoa flavors to shine without unwanted sodium interference, though a pinch of flaky sea salt can be added later if desired.
Step-by-Step Instructions
Follow these chronological steps precisely to prevent dry pockets of flour and to ensure even heat distribution throughout the baking process.
1. Preheating and Pan Preparation
Preheat your oven to 350°F (177°C) with the oven rack positioned securely in the center guide. Lightly coat a standard 9×13-inch glass or ceramic baking dish with unsalted butter or a high-quality nonstick baking spray.
2. Establishing the Fruit Base
Open both cans of cherry pie filling and empty them directly into the bottom of the prepared baking dish. Using a flexible silicone spatula, smooth the cherries into a uniform, level layer. Ensure the fruit completely covers the bottom of the pan to prevent the cake mix from coming into direct contact with the base of the dish.
3. Layering the Dry Media
Evenly sprinkle the dry chocolate cake mix over the cherry layer. Work slowly from the edges toward the center to ensure an even blanket of powder. If you notice any dense clumps in the cake mix, gently break them up using the prongs of a fork.
Important Baker’s Note: Under no circumstances should you stir, fold, or mix the cake powder into the cherries. The layers must remain completely distinct to achieve the signature dual textures of the dump cake.
4. Distributing the Butter
Slowly pour the fully melted butter across the top of the dry cake mix layer. Aim for maximum surface coverage, guiding the stream of butter over dry pockets. It is entirely normal for small patches of dry mix to remain visible; the bubbling fruit juices from below will compensate for these areas during the baking process.
5. The Baking Process
Transfer the baking dish to the center rack of the oven. Bake uncovered at 350°F (177°C) for 45 to 50 minutes.
To determine doneness, observe the visual cues: the cherry filling should bubble vigorously around the perimeter of the pan, and the top chocolate layer should set into a dull, crinkled, brownie-like crust with no remaining patches of raw, powdery flour.
6. Cooling and Setting Phase
Remove the cake from the oven and set it onto a wire cooling rack. Allow the dessert to rest undisturbed for 15 to 20 minutes before slicing or scooping. The fruit sugars emerge from the oven at a scorching temperature; this cooling window allows the starches in the pie filling to cool and set, turning into a beautifully thick, scoopable consistency.
Preparation Timeline and Workflow
| Phase | Duration | Key Focus |
| Prep & Assembly | 5 minutes | Layering ingredients without stirring. |
| Baking | 45–50 minutes | Achieving a bubbly edge and set crust. |
| Cooling | 15–20 minutes | Thickening the fruit base for clean serving. |
Expert Tips and Variations
While the basic 3-ingredient formula is exceptionally reliable, slight adjustments can customize the dessert for distinct gatherings or dietary preferences.
The Grated Butter Technique
If you struggle to distribute melted butter evenly, try the cold-grating method. Freeze your 1.5 sticks of butter for 20 minutes, then use a standard box grater to shred the cold butter into uniform flakes. Scatter the shredded butter evenly over the dry cake mix. As the oven heats, the butter shreds melt simultaneously across every millimeter of flour, virtually eliminating any chance of dry powdery spots.
Flavor Upgrades and Tweaks
-
The Black Forest Variation: Before adding the cake mix, stir 1/2 teaspoon of pure almond extract and 1/2 cup of semisweet chocolate chips directly into the cherry pie filling. The almond extract deepens the stone-fruit character of the cherries, aligning the flavor profile with an authentic German Black Forest gateau.
-
The Nutty Crunch: Scatter 1/2 cup of finely chopped pecans, walnuts, or sliced almonds over the dry cake mix immediately before applying the butter. The nuts roast beautifully in the butter fat during baking, adding a toasted crunch.
Dietary Modifications
-
Gluten-Free Adaptation: Substitute the standard cake mix with an equal-sized box of certified gluten-free chocolate cake mix. Ensure your chosen brand of pie filling specifies gluten-free processing.
-
Dairy-Free / Vegan Alternative: Swap the traditional unsalted butter for an equal volume (3/4 cup) of melted plant-based butter or a neutral oil such as melted refined coconut oil.
Serving Suggestions
Because this chocolate cherry dump cake is undeniably rich, it benefits greatly from accompaniments that introduce contrast—either through temperature, acidity, or texture.
-
Classic À La Mode: Serve a warm scoop of the dump cake alongside a generous scoop of high-quality vanilla bean ice cream. The melting ice cream creates an instant custard sauce that cuts through the deep chocolate fudge.
-
Tangy Chantilly Cream: Whip heavy cream to soft peaks with a tablespoon of powdered sugar and a dollop of crème fraîche or Greek yogurt. The subtle tanginess of the cultured dairy acts as a beautiful counterweight to the sweet cherry base.
-
Beverage Pairings: Pair this rich dessert with a cup of dark, smoky roast coffee, an intense espresso, or a cold glass of milk to balance out the sweetness.
Storage and Reheating Manual
Proper storage preserves the delicate moisture levels of the cake without allowing the top crust to turn overly soggy.
Refrigeration
Allow any leftover dump cake to cool completely to room temperature. Cover the baking dish tightly with a layer of plastic wrap or heavy-duty aluminum foil, or transfer the leftovers into an airtight storage container. Keep refrigerated for up to 4 to 5 days.
Freezing
This dessert holds up remarkably well to freezing. Once cooled, portion the cake into individual serving squares. Wrap each portion securely in plastic wrap, followed by a sturdy layer of aluminum foil. Freeze for up to 3 months. Thaw individual portions in the refrigerator overnight before heating.
Reheating Instructions
-
Oven Method (Best for large portions): Place the desired amount of cake in an oven-safe dish, cover loosely with foil to prevent drying, and warm in a 325°F (163°C) oven for 12 to 15 minutes. Remove the foil during the final 3 minutes to recrisp the top crust.
-
Microwave Method (Best for quick treats): Place a single serving on a microwave-safe plate. Heat on medium power (70%) for 30 to 45 seconds until the center fruit layer is warm and gooey. Avoid high power, which can toughen the chocolate proteins.
Nutrition Information
The following values represent realistic estimates calculated per single serving, assuming the standard 9×13-inch cake is divided evenly into 12 portions.
-
Calories: 340 kcal
-
Protein: 3 g
-
Fat: 14 g
-
Saturated Fat: 8 g
-
Carbohydrates: 52 g
-
Fiber: 2 g
-
Sugar: 34 g
-
Sodium: 360 mg
Disclaimer: Nutritional values are calculated based on standard ingredient packaging data and should be treated as estimates rather than strict medical claims.