


The Ultimate Classic Tarte Tatin: Foolproof Caramelized Apple Tart
Master the legendary French upside-down pastry with this step-by-step guide to achieving mahogany-glazed apples and shatteringly crisp puff pastry in a cast-iron skillet.
By [Your Name/Editorial Team]
The Tarte Tatin is the crown jewel of rustic French desserts. Born from a legendary kitchen mishap by the Tatin sisters in the Loire Valley during the 1880s, this dish transforms humble ingredients—apples, butter, sugar, and flour—into a sophisticated masterpiece.
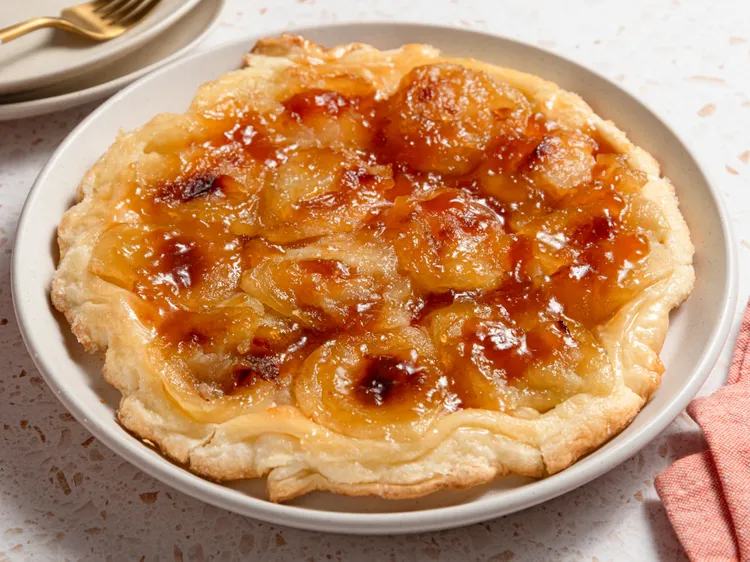
Unlike a standard apple pie, where the fruit is steamed inside a crust, a Tarte Tatin relies on direct contact with heat. The apples are poached in bubbling butter and sugar until they turn translucent and fondants, bathing in a rich, dark caramel. Topped with pastry and baked, the tart is flipped upside down to reveal a glistening, golden mosaic of fruit.1
For the home cook, the Tarte Tatin is the perfect dinner party dessert. It requires minimal ingredients, offers a dramatic tableside presentation (the flip!), and delivers a flavor profile that balances the deep, slightly bitter notes of burnt sugar with the tartness of apples and the richness of butter.2
This recipe is designed to be foolproof. We use a cast-iron skillet for superior heat retention and a specific “stovetop-to-oven” technique that ensures your pastry never gets soggy and your caramel never seizes.3
Why This Recipe Works
-
The Cast-Iron Advantage: Using a 10-inch cast-iron skillet allows you to make the caramel, cook the apples, and bake the pastry all in one vessel.4 This minimizes cleanup and ensures even heat distribution.
-
Pre-Cooking the Apples: Many recipes fail because they put raw apples directly into the oven. We cook the apples on the stovetop first to release excess moisture, concentrating the apple flavor and ensuring the caramel remains thick and glossy, not watery.
-
The “Chill” Technique: Keeping the puff pastry ice-cold until the moment it hits the hot apples guarantees maximum “lift” and flakiness.
Ingredients & Equipment
Precision is key in French pâtisserie. Use a kitchen scale for the best results, though standard U.S. cup measurements are provided below.
The Equipment
-
10-inch Cast-Iron Skillet (or a heavy-bottomed ovenproof sauté pan)
-
Vegetable Peeler & Corer
-
Heatproof Spatula
-
Large Serving Platter (Must be flat and at least 1-inch wider than your skillet diameter)
The Filling
-
6 to 8 Large Apples: Total weight approx. 2.5–3 lbs.
-
Best varieties: Granny Smith (for classic tartness and structure), Honeycrisp, or Braeburn.5 Avoid Red Delicious or Gala, as they disintegrate under high heat.
-
-
½ cup Unsalted Butter (4 oz / 113g): Cut into cubes, room temperature.
-
¾ cup Granulated Sugar (5.25 oz / 150g): Standard white sugar is best for monitoring color.
-
Pinch of Kosher Salt: Essential to balance the sweetness.
-
½ teaspoon Vanilla Bean Paste (optional): Adds floral complexity.
The Pastry
-
1 Sheet All-Butter Puff Pastry (approx. 8-10 oz): Thawed according to package instructions but kept refrigerated.
-
Note: While traditional pâte brisée (shortcrust) is authentic, high-quality all-butter puff pastry creates a lighter, more elegant texture that contrasts beautifully with the dense apples.
-
-
All-Purpose Flour: For dusting.
Step-by-Step Instructions
Phase 1: The Mise en Place
-
Prep the Apples: Peel the apples. Cut them into quarters and remove the cores. If your apples are exceptionally large, cut them into sixths.
-
Chef’s Tip: Do not slice them thinly. You want chunky wedges that can withstand the heat without turning into applesauce.
-
-
Prep the Pastry: On a lightly floured surface, roll your cold puff pastry into a circle roughly 11 inches in diameter (slightly larger than your skillet). prick the dough all over with a fork (docking) to allow steam to escape. Transfer to a baking sheet and return to the fridge immediately.
Phase 2: The Caramel Base
-
Melt and Mix: Place your cast-iron skillet over medium heat. Add the cubed butter and let it melt. Sprinkle the sugar evenly over the butter.
-
Cook to Amber: Cook, stirring occasionally with a heatproof spatula, until the mixture combines and turns a pale golden color (approx. 5–8 minutes).
-
Visual Cue: The butter and sugar may look separated at first. Keep stirring; they will emulsify into a smooth syrup.
-
-
Season: Remove from heat. Stir in the salt and vanilla paste (if using).
Phase 3: The Assembly & Stovetop Poach
-
The “Puzzle” Arrangement: Be careful—the caramel is extremely hot. Arrange the apple quarters in the pan in a concentric circle. Place them curved-side down, standing them up on their edges if possible. Squeeze them in tightly. Fill the center with the remaining apples.
-
Why pack tight? Apples lose water and shrink as they cook. A loose arrangement will result in a tart with large gaps.
-
-
Stovetop Cooking: Return the skillet to medium heat. Cook the apples in the caramel for 15–20 minutes.
-
Baste the apples occasionally with the bubbling caramel liquid.
-
The Goal: You want the apples to soften slightly and the liquid to turn a deep, rich amber color (mahogany). If the caramel is pale, cook longer. If it nears black, remove from heat immediately.
-
Phase 4: The Bake
-
Preheat: While apples are poaching, preheat your oven to 400°F (200°C).6
-
Cover: Remove skillet from heat. Retrieve your pastry from the fridge. Drape the cold pastry over the hot apples.
-
Tuck: Carefully tuck the overhanging edges of the pastry down between the apples and the skillet wall. This “tuck” creates the structural rim of the tart.
-
Bake: Transfer the skillet to the oven. Bake for 25–30 minutes.
-
Doneness Check: The pastry should be puffed and deep golden brown. The caramel should be bubbling up around the edges.
-
Phase 5: The Flip
-
Rest: Remove from the oven. Let the tart rest in the skillet for exactly 10 minutes.
-
Crucial: If you flip too soon, the hot liquid caramel will run off the plate. If you wait too long, the caramel will harden, sticking the apples to the pan.
-
-
Invert: Place your serving platter upside down over the skillet. Wearing oven mitts, hold the skillet handle and the plate firmly together. In one swift, confident motion, flip them over.
-
Reveal: Lift the skillet off. If any apples stick to the pan, simply lift them out with a spoon and patch them back onto the tart. No one will know!
Expert Tips for Success
| Issue | Solution |
| Soggy Pastry | Ensure you cook the apples long enough on the stovetop. The liquid should be thick and syrupy, not watery, before baking. |
| Burnt Caramel | Use a heavy pan (cast iron) to regulate heat. If using a thin pan, lower the heat. Watch the color closely; “amber” is flavor, “black” is bitter. |
| Apples Shrank Too Much | Buy 1-2 more apples than you think you need. Pack them incredibly tightly; they should feel overcrowded before cooking. |
| Caramel Crystallized | If the sugar clumps, lower the heat and be patient. It will eventually melt back down. Stir gently. |
Serving Suggestions & Variations
How to Serve
Tarte Tatin is best served warm, about 20 minutes after flipping. The contrast between the warm, soft fruit and the crisp pastry is fleeting.
-
The Classic: A dollop of Crème Fraîche. The acidity cuts the sweetness.
-
The Indulgent: A scoop of high-quality Vanilla Bean Ice Cream.
-
The Garnish: A sprinkle of flaky sea salt or fresh thyme leaves for a savory twist.
Dietary Variations
-
Gluten-Free Tarte Tatin: Substitute the puff pastry for a store-bought gluten-free pie crust or puff pastry sheet. The filling is naturally gluten-free.
-
Vegan Tarte Tatin: Use high-quality vegan butter (block style, not tub) and vegan puff pastry (many commercial brands are accidentally vegan as they use oil instead of butter).
-
Pear Tarte Tatin: Swap apples for firm Bosc pears.7 Add a pinch of cardamom to the sugar.
Storage and Make-Ahead Instructions
While this dessert is best eaten fresh, leftovers can be managed.
-
Room Temperature: If serving within 4 hours, leave the tart on the platter at room temperature.
-
Refrigerator: Store leftovers loosely covered in the fridge for up to 2 days. The pastry will lose its crunch.
-
Reheating: Do not microwave. Place slices on a baking sheet and warm in a 350°F oven for 5–8 minutes to revive the pastry crispness.
-
Freezing: Not recommended. The caramel tends to weep and the pastry becomes sodden upon thawing.
Nutrition Information
Estimates per serving (Based on 1/8th of the tart)
-
Calories: 345 kcal
-
Total Fat: 20g
-
Saturated Fat: 11g
-
-
Cholesterol: 45mg
-
Sodium: 140mg
-
Total Carbohydrates: 40g
-
Dietary Fiber: 3g
-
Sugars: 26g
-
-
Protein: 3g
Disclaimer: Nutritional values are approximate and depend on specific brands of butter and pastry used.
Frequently Asked Questions
Can I make the Tarte Tatin ahead of time?
You can prep the recipe up to the point of baking. Cook the apples in the caramel on the stovetop (Steps 1–7), then let the skillet cool completely. Leave it at room temperature for up to 4 hours. When ready to serve, reheat the caramel slightly on the stove until loose, top with cold pastry, and bake as directed.
My skillet handle is too long for my oven. What should I use?
If you don’t have an oven-safe skillet, you can make the caramel in a saucepan. Pour the hot caramel into a 9-inch round cake pan (not springform, as it will leak). Arrange apples in the cake pan and bake. Note: You will skip the “stovetop poaching” phase, so bake the tart for an extra 10–15 minutes at a slightly lower temp (375°F) to ensure apples are tender.
What is the difference between Tarte Tatin and Apple Pie?
The primary difference is the cooking method and crust placement. Apple pie has a bottom (and often top) crust and the filling is baked inside.8 Tarte Tatin is an upside-down tart where the fruit is caramelized directly in the pan before the crust is added on top, resulting in a deeper, toffee-like flavor profile.9